Blog Archive

Saturday, August 12, 2006

Pedal Box, Brake Booster, M.C & Gas Tank


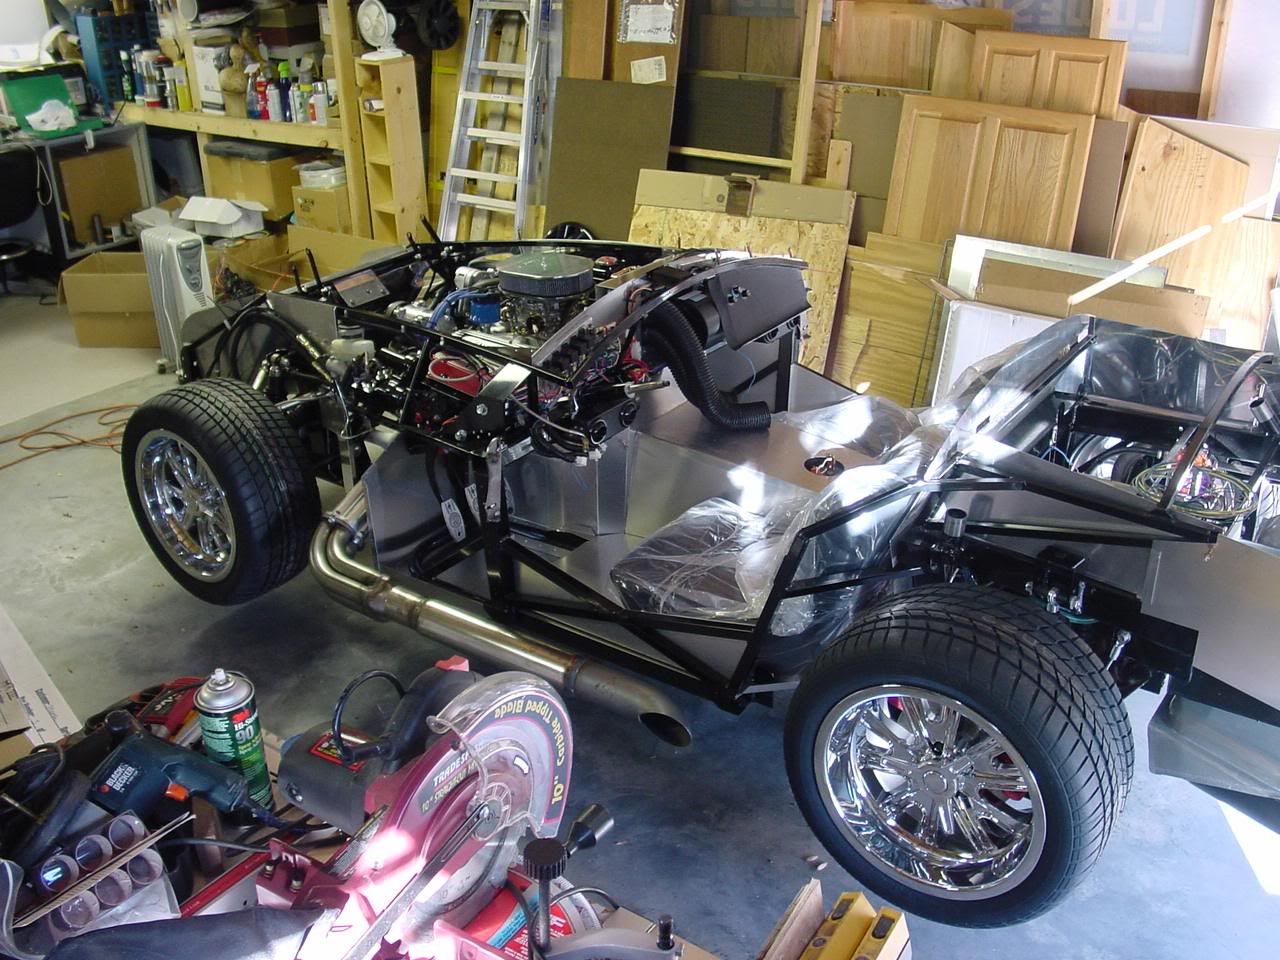
This past week or so has been spent on getting the pedal box, brake booster and master cylinder installed. The kit is designed to use manual brakes, but I have read about some guys that weren't happy with their brake systems due to the amount of foot pressure required to lock up the wheels. If one was to follow the FFR instructions, they say to bolt the master cylinder right onto the firewall and leave out the brake booster all together. In order to use the brake booster I had to cut a non-load bearing frame member so the booster would fit. I also enlarged a few holes on the steel firewall plating to make room for the brake booster.

You can see the frame modification in the photo below. Notice how the frame "dog-legs" around the brake booster. It used to be straight!


I'm not very happy with my pedal configuration right now, but I still need to bend the brake and clutch pedal arms. I have a small tool (pedal bender) on the way, thanks to the ffcobra forum, that will help me get the pedals in the correct location. I may end up buying a new gas pedal assembly, but I'm going to hold off until after getting the other pedals bent and see how it feels then. Right now my size 10 feet would have a really hard time. The photo is sort of deceiving. There is about a half inch of clearance between the gas and brake pedal. They're not touching, even though the photo makes it look that way. The below photo is the gas pedal that I'm thinking about buying. It's a Russ Thompson pedal and is built specifically for a FFR Cobra car.


http://www.norcal-cobras.com/store/russ_garage/russ_garage.htm


The gas tank went in with no problems at all. It took several hours to clean and paint it, but was an easy bolt in process.


I picked up a new chrome rear diff. cover off of eBay. The original one was pitted from rust and looked awful. I figured I might as well take a photo of the new cover now because once the car is built I won't be able to see the chrome cover. At least I can look at it while I'm building the car!

I also just got started bending some of my brake lines. I remembered to save the Mustang rear axle brake line, so I was able to use it by just changing the bends a little bit. The brake line that does all of the looping is a new line that is provided by FFR. I'm the one that made the loop and bends in that line. It was all made possible by cousin Tim again. He loaned a tubing bender to me and it's working great so far. Some guys really have trouble with the brake lines, but so far everything has gone smooth for me. I'm hoping that I'm not going to have to flare any new connections since all of the FFR provided lines are pre-flared. If I end up messing up any of the FFR lines, pre-flared brake lines at Auto Zone are very inexpensive.

Time to head out to the garage and get to work. I think I'm going to start drilling some of the hundreds of holes required to install the aluminum panels. I've been looking forward to getting to play with CLECKOs! Check back later to find out what a CLECKO is!

Sunday, July 09, 2006

Problem Solving - LCAs/Wheels/Spinners

I decided to use my FFR front LCAs rather than trying to sell them. The FFR LCAs look really nice since they are tubular, but probably don't really add much to the handling of the car. In order to get the old LCAs off and put on the new FFR ones, I basically had to take the entire front suspension back off of the car and swap them out. Once getting the new ones on, I noticed that the nylon LCA bushing was turning in the LCA housing. I didn't like it working like that since the bushing isn't lubricated and isn't suppose to turn in the LCA. The bushing is suppose to move around the metal sleeve, especially since that is where the lubrication is.


This photo clearly shows that I'm getting plenty of pressure on the steel sleeve once everything is torqued down. Notice the sleeve impression on the steel washer.


The below link is one of the message threads where myself and several other guys had the same problem.

http://www.ffcobra.com/ubb/ultimatebb.php/ubb/get_topic/f/1/t/076001.html#000018


In order to press the sleeves and bushings out of the LCA I had to buy more tools! I found the above Arbor Press at Harbor Freight for less than $30.00.


Pressing the sleeves out!


The LCA with the sleeves now pressed out.


With the sleeves already pressed out, the bushing slides out really easy by hand.

I first attempted to fix the problem by sanding down one of the steel sleeves to a smaller size. Sanding down a steel sleeve in this manner was very labor intensive and didn't really fix the problem, even after taking it down by .015".


Starting measurement.


Sanding down the sleeve the SLOW painful way..


45 minutes later.. whew! Unfortunately, it didn't fix the problem.


After putting things together and taking things apart numerous times, I finally got the problem fixed. As recommended by someone on the ffrog forum, I chamfered the inside edge of the of the LCA housing like shown above. PROBLEM SOLVED!

After getting the LCA issued fixed, I received my brand new Halibrand spinners that are suppose to mount on my Halibrand wheels. I quickly noticed that the spinner attachment was going to interfere with how the front wheels were suppose to mount on the car.


Here's a photo of another builder's car that has the same wheel/spinner/tire combination that I plan to use. He's using different front spindles, so he didn't run into the problem that I have.

I explained my problem to my cousin Tim. He works in a Machine Shop and was able to help out with getting my new Halibrand Spinners to fit over the front wheel rotors. Thanks to his help my wheels will now fit with the spinners attached and I won't have to run wheel spacers or increase the length of the wheel studs! THANKS TIM!

Newly machined spinner cap.

Rotor after it was machined. I know the dust cap looks really bad, but it won't be visible once the wheel and spinner is mounted.

The spinner cap now fits down over the top of the rotor hub, rather than on top.

So what's next you ask? I've already started playing with the Pedal Box, some of the brake line bending, Power Brake Booster and I still have the gas tank waiting to be installed. Oh yeah, I also get to cut on the frame a little! Check back soon for more info!

Monday, June 26, 2006

Rear Suspension Photos & More!


The 3-link rear suspension is pretty much done. I still need to torque everything down, but I'm pretty sure everything is together the right way. This was probably one of the more physically challenging parts of the build due to the weight of the rear axle and other components.

Getting that axle with the brake assembly attached through the left triangular area of the 3-link frame was no easy task. I used two jacks, one wife and whole bunch of grunting and groaning before it was finally positioned in the correct location. Sorry, I know it's a "busy" photo and it's hard to make out exactly what you're looking at. The Factory Five manual is absolutely awful when it comes to explaining how to put everything together. I find most of my answers to my questions on the www.ffrog.com message board. Almost every question has been asked and answered many times and can be reviewed by searching the message archives.


Yesterday I got to work on the steering assembly. Everything went together without too many issues. I discovered that Factory Five failed to provide a needed bolt that is suppose to attach the lower steering shaft to the steering rack. I called them today and they said they would put the needed hardware in the mail to me. That's fine with me since I'm certainly in no hurry.

After putting the steering wheel on the upper shaft I was suddenly overcome with the incredible urge to throw a seat in the car and see how it felt to sit in the car and steer it. Okay, okay, I may have made a "vroom, vroom" noise once or twice.. It felt pretty good!

So I guess that it's for this blog entry. I expect that in the coming days I will finish up putting the proper torque on the rear suspension bolts and then start working on the gas tank. I'll be using the gas tank from the Mustang donor car, which is in serious need of a good cleaning and painting. See ya!

Sunday, June 04, 2006

Rear End Work / More Donor Parts Sold

Sorry, I have no additional photos to post at this time. The rear end work on the car is coming along. This past week I received the rear 250# springs from FFR. They had been on back-order since receiving my kit. I spent quite a bit of time trying to get the rear axle/pumpkin assembly clean so that I could paint it. It is now painted and I just need to get to work putting everything together.

This past week I also sold more Mustang donor parts! The mirrors just sold a few days ago and my 89 Mustang donor cost is now down to $260.00! UPDATE! The steering rack and tires/wheels just sold! Total Donor Cost is now down to $185.00!

The 98 Cobra is now listed for sale in Auto Trader. I've had a few people stop by and look at it, but still no serious bites. I may have to fix a couple of more problems with the car before I can expect to get the $10,000 ($9,995.00) that I'm asking.. It has an undiagnosed oil leak coming from the rear of the engine. I think it's either the rear main seal or the oil pan gasket. Either way, it's at least a weekend of work to get it fixed. The oil pan gasket replacement will require unbolting the lower K-member. Sounds easy, huh?? Well the engine has to be unbolted and then supported from the top before dropping the K-Member.. If it's the rear main seal, that involves unbolting the transmission and moving it away from the engine. I'm thinking it's probably the pan gasket because the clutch in the car seems to work fine. If I understand things correctly, if the rear main seal was leaking, I would have oil running down the flywheel and on to the clutch plates, thus causing problems with proper clutch operation. I may try buying some oil dye and see if I can isolate exactly where the oil is coming from.

Monday, May 22, 2006

Front Suspension & Brakes

After receiving my car, the first order of business was getting a good inventory done. I inventoried every nut, bolt and part. FFR did a great job and sent everything they were suppose to. There are a few items back ordered, but I expect to have those parts in a few weeks. I found that the third leg of my roll bar had a scratch in the powdercoat. I called FFR and they promised to send another one. It took two evenings after work for me to get the inventory completed. I now have boxes of car parts in the attic, in the garage, in the closet and out in the storage shed. I hope I remember where I put everything!


This past weekend I started working on the front suspension of the car. The above photo kind of gives you an idea of the sort of minor obstacles that tend to slow me down. Not that it's all that hard to enlarge a hole, but everytime I run into something like this it makes me go running for the computer so that I can do research, to make sure I'm not screwing something up

I first started with cleaning up and painting the donor spindles. I sprayed them with a Rustoleum Hammered Black paint. I think they turned out really nice looking.


After getting the spindles, coil-over shocks and upper A-arms installed, I last step was to install the tubular lower control arms. Factory Five has had my tubular lower front control arms on back order for the past 4 weeks. I hadn't really planned on buying the FFR control arms since they are a $480 option, but I ended up getting them with my kit as a part of the Factory Five Winter Sale. http://parts.factoryfive.com/newcatalog/chassis/frontlower.htm I've now decided to use the donor Mustang lower control arms and sell the FFR tubular LCAs when they arrive. I'm thinking that I can get $400+ for them by advertising on the ffrog.com Classified area of the board. The LCAs really aren't visible once the car is built and the handling performance gain is minimal at best, especially since I have no racing plans for the car.


The Mustang LCAs only require minor modification in order to use them on the FFR Cobra. Basically a little notch needs to be cut into the LCA in order to get the shock mount some clearance. You really can't see the notch I made in the photo above, but it's right behind where the shock mounts to the LCA.

The donor Mustang used 4 lug wheels, but I decided to convert to 5 lugs since the wheel selection is much greater and generally less expensive. There is lots of information available on the Internet that explains how to go about doing the conversion. The two links below are a couple of the best ones I found.

http://www.stangnet.com/tech/lug.html
http://sn95brakes.cjb.net/

Since my donor is a Fox Body 89 Mustang, the conversion only consists of using 5 lug front rotors from a mid 80's Lincoln Continental, Lincoln Mark VII (85-91), or '84-'86 SVO. In order to convert the rear wheels I needed to find '83-'92 Ranger/Bronco II Left (driver) side axle (29-5/32") from a 4cyl or 3.0L V-6 with the 7.5" rear end, or '86-'97 Aerostar RIGHT side axles (29-5/32"). They are the same rear axles, the center section is just on the opposite side when you compare the rear ends. The pumpkins are also off center unlike the Mustangs, so I had to find two vehicles to pull axles from! I will need the drums from either of these vehicles also since I'm staying with rear 9" drums. The 7.5 axle Rangers & Aerostars use 9" drums. These parts are direct 5 lug replacements for the stock 9" rear drums on the 79-93 Mustangs. I will just buy new drums and use the donor Mustang 4 lug drums to swap out for the core charge!

I went to a U-Pull It Salvage Yard in Grand Prairie and found the above mentioned axles. I got both axles for $30.00!

I had planned on buying the 5 lug front rotors from the auto parts store but I got lucky and found someone on www.dfwstangs.net that was selling brand new "still in the box" rotors. The person was planning on doing his own 5 lug conversion, but later decided that he wanted the more expensive Cobra brakes which use a larger rotor. He sold the brand new rotors to me for $35.00, so I think I came out pretty good on that deal too!


A big part of this weekend was also spent cleaning up and rebuilding the donor Mustang brakes.


I used some DupliColor caliper paint and painted them red. I'm very happy with the way they turned out! The front suspension and brakes are now DONE!

I ran across this web page for Hot Rod Magazine. It has a couple of magazine articles online that talk about the Factory Five car that I'm building. Take a look and see what I have to look forward to!

http://hotrod.com/projectbuild/hdrp_ffr_cobra_kit_car_project_build/


The wheels for the car have been purchased and are now in the garage! I got 17X9s for the front and 17X10.5's for the rear. Discount Tire Online Direct http://www.discounttiredirect.com/ had a sale a short time ago. They advertised on the www.ffrog.com discussion board and they sold out in a day or two.. Not bad for $105.00 per wheel! I managed to get their very last set.


So that's it for another BLOG post on my FFR MKIII Cobra Build. It will probably be a week or two before I make another BLOG entry. The next couple of weeks will involve installing the 3-link rear suspension. Based on what I've read on the discussion board, it's a pretty straight forward installation. I need to decide in the next few days if I'm going to keep the stock Mustang 2.73 rear diff. gears or upgrade to something like a 3.55 gear ratio. The FFR manual says the upgraded gear set really "wakes the engine up.." hmmmm.. how awake do I need my engine? The gears can be purchased for less than $200, but I would probably have to pay a shop to install them. I've heard that it's real easy to mess up getting it shimmed the correct way. I guess I'll be doing a little more research and come to a decision soon.

Saturday, May 13, 2006

Delivery (D-Day) of the Kit


As is the case with most BLOGS, to read everything in chronological order, start at the bottom of the page with the BLOG entry named "The Beginning." The newest entry is always at the top of the page. Click on photos for full size versions!

April 12, 2006 is the day! At about 5 P.M. I received a phone call from the Stewart Transport drivers and they said they were passing through Greenville, Texas and should be at my house within the next two hours. So it was now time to run out to the garage and start getting things ready.


I moved the GoldWing out of the way and position the jack stands which will be the new home of the Roadster for the next 4-6 months. The wooden structure out on the driveway is something called a body buck. I built the body buck to hold and support the fiberglass body of the car. The body will sit on top of the body buck and the chassis of the car will sit on the jack stands below the body buck. When I want to work on the car I will be able to roll the body buck (w/body) out of the garage and into the driveway. At the end of the day the body buck will be rolled back in the garage and be stored over the work in progress.

A short time later Cheryl was outside and yelled into the garage, "I think I hear them coming!" Seconds later they pulled up in front of my house and started unloading. As the body of the car was off loaded, I received my first compliment on my car. Some guy slowed down and stopped and said, "that's a nice Cobra" and then drove off.


My car was the last car to be delivered by Stewart Transport on this trip, so it's sitting all alone on the truck.


First all of the boxes were off loaded. I'm going to have to get creative with finding places to put all of the boxes. My garage is already pretty full!


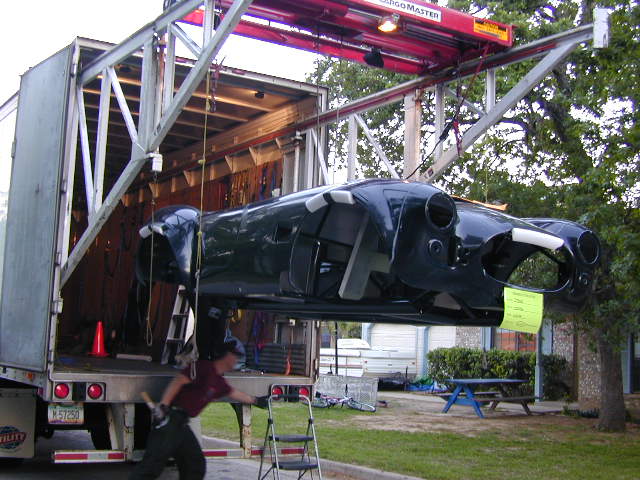
Last but not least, the body comes off. Pretty neat winch/crane type of set up used by Stewart Transport.


I almost asked if I could sit in the car while he pushed it up the driveway, but Cheryl said it wouldn't be a good idea.. Oh well...


Car safe and sound in MY garage. I'm now the proud owner of Factory Five MKIII Roadster #5392!


The next day my friend Chris came over and helped me take the body off of the chassis. In this photo I have already mocked up the steering rack position.


So that's it for this week. Next week I'll hopefully get some time to start working on the car.

Saturday, April 29, 2006

Garage Mods and Car Delivery!

As is the case with most BLOGS, to read everything in chronological order, start at the bottom of the page with the BLOG entry named "The Beginning." The newest entry is always at the top of the page. Click on photos for full size versions!


The first thing I did to my garage was get rid of a bunch of stuff that was taking up space that I didn't really need. I then built an 8 foot wooden work bench and installed a bunch of electrical outlets. You can see one set of outlets above the bench. There are additional ones below the bench.


In anticipation of the 100+ degree summer days here in Texas, I installed a ceiling fan in the garage over the area that I expect to be doing most of my car building.


I should have done this a long time ago! I installed these overhead fluorescent lights. They make seeing things much easier. I've done tons of previous motorcycle work in the garage and always needed more lighting. I know, I know, you can see the the body of my FFR Roadster in the photo. I didn't take photos of the lights until after the car was delivered.. More information and photos of the car delivery will be posted soon!

Did you notice my nice little digital clock that I installed on my BLOG page near the top? Something so simple shouldn't have taken me 2 hours to get working right. Me and HTML sure don't get along very well together. Oh well, this BLOG stuff is much easier than trying to deal with a full blown web page.


Oh yeah, my little Sears Craftsman compressor gave up the ghost a few days ago. It was only a little over 2 years old and Sears said they couldn't order the parts I needed to fix it. For almost $350 it should have lasted much longer than 2 years! I went to Harbor Freight and purchased this new U.S. General 60 gallon compressor. I hope it will last a bit longer. It almost triples the air output, compared to my old compressor.

Here are the stats on the new compressor.

US General Model #US660V
3.5 Horsepower
130 PSI MAX
14.55 CFM @ 40 PSI
12.85 CFM @ 90 PSI

Still not big enough for serious paint work, but it should serve my purposes for now.

My clock says it's 1:30 AM.. Time to get to bed. Car delivery photos will be posted soon!